Passer la navigation

Tag Archives: TD

Let’s talk about optimization!!

This post give me the idea to start a thread on CgSociety’s forum to talk about optimization please join us HERE.

I want to show you a little tool created for an automatic optimization in production (Used on 4 productions) linked with an XML database.

This tool is exactly used like a sonar it detect all object viewed by the camera on a single frame, on a frame range or active segment. All those object are detected compared to a databased by production, that mean if you have specific objects you want to be ignored the script will automatically used those informations to make comparison with viewed object.

They are too steps in comparison a first one on detection that mean when detecting object it will ignore specified objects, class, Id … a second detection when choosing to hide/unhide objects outside view this detection is running at the complete end of script.

I have choose to put all objects outside view inside hidden Layer that an operator can check our not. If you want to separate objects inside another layer for any objects outside view you can add this filter inside the database for example: particles emitters if you putt them in same layers you can delete them and that will modify all particles if using same pflow for all similar objects.

Of course this tool isn’t good usable for objects that reflect his environment like Kaeloo (production Cube and Blue Spirit Studio). In this production characters reflect a reflection Sphere, clouds and sky that’s why those object are by default ignored by the Blue Sonar.

Blue Sonar parameters:

1-Choice between scanning:

2-Stationary camera (single frame)

3-Active Segment

If you choose 2 or 3 you can specify Every « n » frames to scan.

All those scanning option have a common Offset value to include a little bit more than the camera FOV for a maximum 90 degrees of FOV that mean if you camera is a 45 degree of FOV you have access to a maximum offset of 45 degree.

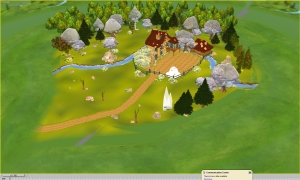
The camera view before blue sonar.

The camera view before blue sonar.

What's around the camera view before blue sonar.

What's around the camera view before blue sonar.

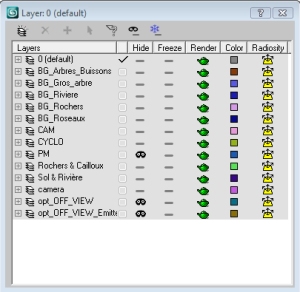
Scene's Layers before blue sonar.

Scene's Layers before blue sonar.

The camera view after blue sonar.

The camera view after blue sonar.

The camera view after blue sonar demonstrate that nothing change between the before and after view.

Around the camera view after blue sonar.

Around the camera view after blue sonar.

Around the camera view after blue sonar let you see what disappear after using Blue sonar.

Scene's layers after blue sonar.

Scene's layers after blue sonar.

You can see too layers created at the bottom list they are automatically hidden. The first one can be deleted if you in camera view if nothing disappear and the second one is used to stored all emitters outside camera view that you do not have to delete.

Final image

Final image

The problem is using this tool for all the timeline lenght take too long to be done when you are waiting in front of your computer that’s why i used the script heart as simple maxscript to use inside the Paul neal’s « batchItMax » this script have a single offset value 15 degrees. With this workflow we can optimize automatically 140 shots in one night it’s a big time saving.

Those tools are ready to use but not yet implemented. They are completly working but we are waiting to implement them in good condition maybe on coming productions.

All those tools are based on action script class file (.as) that mean they are using same code it’s faster and can help you to make improvement on all tools in same time.

Slider:

This slider is fully working with morphers (or anything else need to use slider) you have spinner and slider integrate in same tool, the percent number is can be modified by user directly with keyboard. This slider is based on specific class that mean all slider you can create are running from same peace of code it’s really faster than usual sliders in 3dsMax.

Flash based Slider

Flash based Slider

Blend Shape tool:

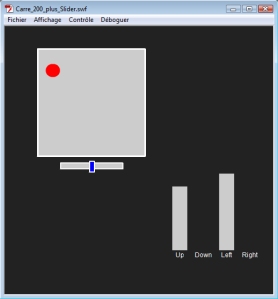
This tools is completely awesome and faster than everything i created before. If you are looking in dotnet tool you can quickly see many problems while using them, slower performances, graphical issue with with the cursor.

Flash based square blend shape

Flash based square blend shape.

Here is a sample of what i made with this UI system.

This UI can automatically detect characters in scene without any datas saved. They are detecting the character’s .bip.

All those settings and parameters are working around 3dsmax’s biped.

All common tools need to work quickly in expert mode (full screen viewport)
You can find TCB tool with XML presets local for each users.
Biped’s copy past tool. Specific scale tool.
Hand position preset with copy past include.
All layers and Named selection set of the current character.
Quick smooth enable disable for the current character, hide unhide bones, hide unhide facial, freeze unfreeze modeling, hide unhide modeling.
The most visible is the synoptic to chose quickly your bones without them visible, this synoptic include shift+click to add more bones, right click to select symmetrical / opposite / select all spine, double click to select all childrens.

the first UI's tab (the common one)

The first UI's tab (the common one)

The most interesting part is the facials preset’s tab based on database with xml saved for every characters, with thumbnail pictures in two sized. When clicking on the thumbnails the expression is apply on the characters with all settings include: morphers, eye’s target positions, pupil’s scale value and more…

Facial presets UI's tab

Facial presets UI's tab

All those screen print are taken from my incoming Demo Reel.

We know how to send a simple call from flash to 3dsMax now we wanna know how to receive and this call inside 3dsMax.
This is not the best way to do that but a good example to have a quick understand of how it works.

First we have to put inside the rollout that host the .swf an listener for all fscommand it’s exactly like the Click

Eventlistener inside Flash viewed in part 3.

on flashhosteur FSCommand cmd args do
(
flash_FSCommand cmd args
)–End Of flashhosteur FsCommand

This command call a function used to filter all fscommand and find the good function to call using a case of.

fn flash_FSCommand cmd args =
(
–format « flash_FSCommand -> % %\n » cmd args
case cmd of
(
« AnimateToggle »:
AnimateToggle args
)
)

Here the case of will read the command argument receive from the fscommand if this cmd correspond to one of the cases it will

read the line just after in our case call another function inside our script.

The fonction called is :

fn AnimateToggle args =
(
if (args == « true ») then
(
animButtonState = true
)
else
(
animButtonState = false
)
)

This function examine the arg value sent by the fscommand.
In simple english this function is doing this:

If fscommand called AnimeToggle, the fscommand send to this function an argument, if this argument is equal to true then turn the animate mode to on else turn it to false.

To toggle animate mode we can simply in the case of:

« AnimateToggle »:
max tool animmode

But the goal is to show you how to use function to call inside an fscommand call. This will be very usefull when making more complicated things.

Here is the final .ms code at this step:

try(destroyDialog flash3dsMax_Explain)catch()  –if opened
try(destroyDialog flash3dsMax_Explain)catch()

fn AnimateToggle args =
(
if (args == « true ») then
(
animButtonState = true
)
else
(
animButtonState = false
)
)

fn flash_FSCommand cmd args =
(
–format « flash_FSCommand -> % %\n » cmd args
case cmd of
(
« AnimateToggle »:
AnimateToggle args
)
)

rollout flash3dsMax_Explain « Flash / 3dsMax Explain »
(
activeXControl flashhosteur « {D27CDB6E-AE6D-11cf-96B8-444553540000} » pos:[0,0] width:500 height:500 releaseOnClose:true

local SwfFile = « C:\\Users\\eddy\\Desktop\\flash3dsMax_explain\\flash_explain_03.swf »

on flash3dsMax_Explain open do
(
try
(
— initialise activeX object
flashhosteur.movie = SwfFile
)
catch
(
— retry
flashhosteur.movie = SwfFile
)
)

on flashhosteur FSCommand cmd args do
(
flash_FSCommand cmd args
)–End Of flashhosteur FsCommand

)
createDialog flash3dsMax_Explain « Shockwave Flash Input Test » width:500 height:500

Actually our Flash UI is plugged directly in 3dsMax but we do not have any interaction between 3dsMax ans Flash.

In this part we will learn how to send calls from Flash to 3dsMax.

It’s pretty simple to send basics informations using « fscommand ».

In our case i want to click on the animate Button of my Flash UI to Activate Animate mode in 3dsMax.

First we have take a look inside our fla. I added a Listener for the animate button to create an Click Event.

animate_sphere_clip.stop();

var buttonAnimateStatue:Boolean = false;

Animate_toggle_bt.addEventListener( MouseEvent.CLICK, AnimateToggle);

function AnimateToggle(pEvt:MouseEvent ):void
{
if (buttonAnimateStatue == false)
{
animate_sphere_clip.gotoAndStop(2);
buttonAnimateStatue = true;
}
else
{
animate_sphere_clip.gotoAndStop(1);
buttonAnimateStatue = false;
}
}

This line says to stop the playing the swf timeline on opening. The .swf stopped to the first frame. Why Make a stop? I have to do that because inside my Flash UI i added to statues to my button one Green and one Red. First Statue for animate mode disable, second statue Statue for animate mode enable in 3dsMax.

Both statues of the animate button

Both statues of the animate button

var buttonAnimateStatue:Boolean = false;

This is a variable declaration used to know the statue of the button. If false the button is green (animate disable), if true the button is red (animate enable).

Animate_toggle_bt.addEventListener( MouseEvent.CLICK, AnimateToggle);

This is the line used to add the Event listener for the Mouse Click. Animate_toggle_bt. is the name of the animate AnimateToggle is the function that the Click Event will call.

function AnimateToggle(pEvt:MouseEvent ):void
{

}

Here is the function AnimateToggle declaration called by listener describe previously.
pEvt:MouseEvent mean this function is linked to a mouse event, in our case a simple click.

function AnimateToggle(pEvt:MouseEvent ):void
{
if (buttonAnimateStatue == false)
{
animate_sphere_clip.gotoAndStop(2);
buttonAnimateStatue = true;
}
else
{
animate_sphere_clip.gotoAndStop(1);
buttonAnimateStatue = false;
}
}

When the AnimateToggle is called we have to check if the animate mode is enable or disable inside flash that mean if the button is green or red because we do not already have feedback from 3dsMax. A simple if function can do that.

Here is the code translate in simple english with false = green and true = red:

On click If the button statue is green then turn the button to red and let the buttonAnimateStatue variable know the button is now red. Else the button is red turn the button to green and let the buttonAnimateStatue know the button is now green.

Now you know how the actual code is running inside flash. Let says to 3dsMax when to turn animate mode on On or off.

We are in flash we will stay in.
We have to add two lines inside our AnimateToggle toggle function. Those line are simple fscommand for the two cases of the if.

function AnimateToggle(pEvt:MouseEvent ):void
{
if (buttonAnimateStatue == false)
{
animate_sphere_clip.gotoAndStop(2);
buttonAnimateStatue = true;
fscommand(« AnimateToggle », « true »);
}
else
{
animate_sphere_clip.gotoAndStop(1);
buttonAnimateStatue = false;
fscommand(« AnimateToggle », « false »);
}
}

fscommand is to use like that: fscommand( CommandName, Argument);

Now we know why using flash in 3dsMax we can now learn how to do it.

This second part will explain how to simply load a swf file in a Max Rollout  using an ActivX Control you can find a good help about ActivX in Maxscript Help in « Shockwave Flash ActiveX Object Events » part. 3ds max have a good help so « Use It!! ».

To host your Flash you need to generate a swf file from flash like this one:

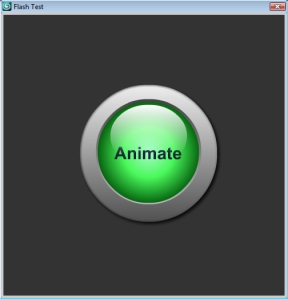
A pic that show my Swf file.

This Pic show you my swf file it's a simple button with two statues "green" and "red" to toggle the Animate Mode in Max.

You doesn’t need to generate a .html to host you .fla a simple .swf is enough.

To host my file i need to create a rollout with the same size as my .swf using this code:

try(destroyDialog flashTest)catch()  –if opened
try(destroyDialog flashTest)catch()

rollout flashTest « Flash Test »
(

activeXControl flashhosteur « {D27CDB6E-AE6D-11cf-96B8-444553540000} » pos:[0,0] width:500 height:500 releaseOnClose:true

local SwfFile = « C:\\Users\\eddy\\Desktop\\flash3dsMax_explain\\vert.swf »

on flashTest open do
(

try
(
— initialise activeX object
flashhosteur.movie = SwfFile
)
catch
(
— retry
flashhosteur.movie = SwfFile
)

)
)
createDialog flashTest « Shockwave Flash Input Test » width:500 height:500

All parts explain:

try(destroyDialog flashTest)catch()  –if opened
try(destroyDialog flashTest)catch()

This part is used to close the rollout if his already opened before you open it again.

activeXControl flashhosteur « {D27CDB6E-AE6D-11cf-96B8-444553540000} » pos:[0,0] width:500 height:500 releaseOnClose:true

local SwfFile = « C:\\Users\\eddy\\Desktop\\flash3dsMax_explain\\vert.swf »

This part is used to create the activX hoster for our swf and create a variable that contain the .swf fil that will be hosted.

DO NOT FORGET to add double « \ » for path names.

If you use an IP adress use this format with:

local SwfFile = « \\\192.168.0.14\\ptites_poules\\flash3dsMax_explain\\vert.swf »

With an IP adress use 3 « \ ».

on flashTest open do

(

try
(
— initialise activeX object
flashhosteur.movie = SwfFile
enableAccelerators = false
)
catch
(
— retry
flashhosteur.movie = SwfFile
)
)

This part is used to initialize the .swf file the rollout when when  opening. We have to done it twice because sometimes it doesn’t work the first time but it always work the second time.

« enableAccelerators = false » it necessary for swf file where you will have keyboard entry if it’s true all the keyboard entry you will make will done inside 3dsMax interface and not the activX.

)
createDialog flashTest « Shockwave Flash Input Test » width:500 height:500

Finaly this part is used to create the final rollout with our swf file accessible.

Here is the final rollout with our .swf file hoster.

This is the first post of many post that will follow (i hope).

First I want to make my apologizes for my English because i’m French but i want this blog is accessible for everyone and English is the good language for that.

I will try to put all my key advancement of my different WIP and make any explanation of my different search advancement.

First i will introduce myself:

My Name is Eddy Lowinski I’m actually Global TD in a company who makes  Animation Series and movies. I’ve started 3d longtime as self-taught person when i was teenager. When my time to choose my studies comes i choose to make CG studies to materialize everything i learned before. Here i was at school for 4 years and i found my actual job during my training.

So this is the story of the beginning (very quick story).

I hope you will follow this blog and enjoy it.